
MySQL Cluster Installation
http://dev.mysql.com/doc/refman/5.6/en/mysql-cluster-installation.html 4개의 노드로 구성된 cluster를 구축해보자.
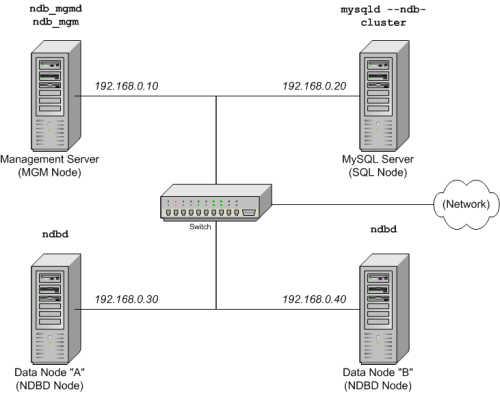
1. Host 준비
- 각각은 separate된 host computer으로 fixed network address가 할당된다.
| Node | IP Address |
|---|---|
| Management node (mgmd) | 192.168.0.10 |
| SQL node (mysqld) | 192.168.0.20 |
| Data node “A” (ndbd) | 192.168.0.30 |
| Data node “B” (ndbd) | 192.168.0.40 |
2. MySQL Cluster Binary 본 준비
- mysql-cluster-gpl-7.3.7-linux-glibc2.5-x86_64.tar.gz
3. SQL node 설치
3.1. mysql user 생성 (root user)
[root@testvm2 ~]# groupadd mysql
[root@testvm2 ~]# useradd -g mysql mysql
[root@testvm2 ~]# passwd mysql
3.2. binary 압축해제 및 symbolic link 생성 (root user)
- mysql direcotry : /db/mysql
[root@testvm2 db]# tar -xzf mysql-cluster-gpl-7.3.7-linux-glibc2.5-x86_64.tar.gz
[root@testvm2 db]# ln -s mysql-cluster-gpl-7.3.7-linux-glibc2.5-x86_64 mysql
[root@testvm2 db]# chown -R mysql. mysql
[root@testvm2 db]# chown -R mysql. mysql-cluster-gpl-7.3.7-linux-glibc2.5-x86_64
3.3. data directory 준비 및 mysql_install_db (root user)
- data directory : /data1/mysql-cluster
[root@testvm2 db]# mkdir -p /data1/mysql-cluster
[root@testvm2 db]# chown -R mysql. /data1/mysql-cluster
[root@testvm2 db]# cd mysql
[root@testvm2 mysql]# ./scripts/mysql_install_db --datadir=/data1/mysql-cluster --user=mysql
4. Data node 설치
- Data node에는 mysqld binary는 필요없고 ndbd (single-threaded) or ndbmtd (multi-threaded) 만 있으면 된다. 이는 binary copy내에 존재한다.
- data node testvm3,4 에서 다음 과정 수행.
4.1. mysql user 생성 (root user)
[root@testvm3 ~]# groupadd mysql
[root@testvm3 ~]# useradd -g mysql mysql
[root@testvm3 ~]# passwd mysql
4.2. directory 설정 (root user)
- mysql direcotry : /db/mysql
- data directory : /data1/mysql-cluster
[root@testvm3 /]# mkdir -p /db/mysql/bin
[root@testvm3 /]# chown -R mysql. /db/mysql
[root@testvm3 /]# mkdir -p /data1/mysql-cluster
[root@testvm3 /]# chown -R mysql. /data1/mysql-cluster/
4.3. SQL node에서 data node로 ndbd, ndbmtd 바이너리 copy (mysql user)
[mysql@testvm2 bin]$ scp ndbd ndbmtd testvm3:/db/mysql/bin
The authenticity of host 'testvm3 (192.168.137.203)' can't be established.
RSA key fingerprint is 91:21:ef:c7:9b:52:2a:44:f3:8d:09:a0:69:bc:71:ac.
Are you sure you want to continue connecting (yes/no)? yes
Warning: Permanently added 'testvm3,192.168.137.203' (RSA) to the list of known hosts.
mysql@testvm3's password:
ndbd                                                                                                                                100%   28MB  27.7MB/s   00:00
ndbmtd
5. Management node 설치
- Management node에는 mysqld binary는 필요없고 Cluster management server (ndb_mgmd), the management client (ndb_mgm) 만 있으면 된다. 이는 binary copy내에 존재한다.
5.1. mysql user 생성 (root user)
[root@testvm1 ~]# groupadd mysql
[root@testvm1 ~]# useradd -g mysql mysql
[root@testvm1 ~]# passwd mysql
5.2. directory 설정 (root user)
[root@testvm1 ~]# mkdir -p /db/mysql/bin
[root@testvm1 ~]# chown -R mysql. /db/mysql
[root@testvm1 ~]# mkdir -p /data1/mysql-cluster
[root@testvm1 ~]# chown -R mysql. /data1/mysql-cluster/
5.3. SQL node에서 Management node로 ndb_mgmd, ndb_mgm 바이너리 copy (mysql user)
[mysql@testvm2 bin]$ scp ndb_mgmd ndb_mgm testvm1:/db/mysql/bin
The authenticity of host 'testvm1 (192.168.137.201)' can't be established.
RSA key fingerprint is 91:21:ef:c7:9b:52:2a:44:f3:8d:09:a0:69:bc:71:ac.
Are you sure you want to continue connecting (yes/no)? yes
Warning: Permanently added 'testvm1,192.168.137.201' (RSA) to the list of known hosts.
mysql@testvm1's password:
ndb_mgmd                                                                                                               100%   15MB  15.4MB/s   00:00
ndb_mgm                                                                                                               100% 6964KB   6.8MB/s   00:00
6.Initial Configuration
- 각 노드에 configuration file을 작성한다.
- data node와 SQL node에는 my.cnf file이 필요하며, 이 configuration file에는 management node에 대한 connection string과 NDBCLUSTER storage engine을 활성화하는 라인이 들어간다.
- management node는 config.ini file이 필요하며, 이 configuratio file에는 관리할 replica 개수, 각 data node에 할당할 memory size, data nodes 정보, 각 data node의 disk 정보, SQL nodes정보가 저장된다.
6.1. Configuring the SQL nodes (root user)
[mysql@testvm2 mysql]$ vi /etc/my.cnf
[mysqld]
# Options for mysqld process:
ndbcluster                      # run NDB storage engine
basedir = /db/mysql
datadir = /data1/mysql-cluster
socket = /tmp/mysql.sock

[mysql_cluster]
# Options for MySQL Cluster processes:
ndb-connectstring=192.168.137.201  # location of management server

[mysql]
socket = /tmp/mysql.sock
6.2. Configuring the data nodes (root user)
[root@testvm3 etc]# vi /etc/my.cnf
[mysqld]
# Options for mysqld process:
ndbcluster                      # run NDB storage engine

[mysql_cluster]
# Options for MySQL Cluster processes:
ndb-connectstring=192.168.137.201  # location of management server

[root@testvm3 etc]# chown -R mysql. /etc/my.cnf
6.3. Configuring the management node. (root user)
[root@testvm1 etc]# vi /etc/config.ini
[ndbd default]
# Options affecting ndbd processes on all data nodes:
NoOfReplicas=2    # Number of replicas
DataMemory=80M    # How much memory to allocate for data storage
IndexMemory=18M   # How much memory to allocate for index storage
                  # For DataMemory and IndexMemory, we have used the
                  # default values. Since the "world" database takes up
                  # only about 500KB, this should be more than enough for
                  # this example Cluster setup.

[ndb_mgmd]
# Management process options:
hostname=192.168.137.201           # Hostname or IP address of MGM node
datadir=/data1/mysql-cluster  # Directory for MGM node log files

[ndbd]
# Options for data node "A":
                                # (one [ndbd] section per data node)
hostname=192.168.137.203           # Hostname or IP address
datadir=/usr/local/mysql/data   # Directory for this data node's data files

[ndbd]
# Options for data node "B":
hostname=192.168.137.204           # Hostname or IP address
datadir=/data1/mysql-cluster   # Directory for this data node's data files

[mysqld]
# SQL node options:
hostname=192.168.137.202           # Hostname or IP address
                                # (additional mysqld connections can be
                                # specified for this node for various
                                # purposes such as running ndb_restore)

[root@testvm1 etc]# chown -R mysql. /etc/config.ini
7. Initial Startup of MySQL Cluster
7.1. management node ndb_mgmd 실행
- mysql direcotry : /db/mysql 에서 실행 (mysql user)
[mysql@testvm1 etc]$ cd /db/mysql
[mysql@testvm1 mysql]$ ./bin/ndb_mgmd -f /etc/config.ini --configdir=/data1/mysql-cluster
MySQL Cluster Management Server mysql-5.6.21 ndb-7.3.7
[mysql@testvm1 mysql]$ ps -ef | grep ndb
mysql    11919     1  0 16:12 ?        00:00:00 ./bin/ndb_mgmd -f /db/mysql/conf/config.ini --configdir=/data1/mysql-cluster
mysql    11934 11638  0 16:13 pts/4    00:00:00 grep ndb
[mysql@testvm1 mysql]$ ./bin/ndb_mgm
-- NDB Cluster -- Management Client --
ndb_mgm> show
Connected to Management Server at: localhost:1186
Cluster Configuration
---------------------
[ndbd(NDB)] 2 node(s)
id=2 (not connected, accepting connect from 192.168.137.203)
id=3 (not connected, accepting connect from 192.168.137.204)

[ndb_mgmd(MGM)] 1 node(s)
id=1 @192.168.137.201  (mysql-5.6.21 ndb-7.3.7)

[mysqld(API)] 1 node(s)
id=4 (not connected, accepting connect from 192.168.137.202)
7.2. data node ndbd 실행
- mysql direcotry : /db/mysql 에서 실행 (mysql user)
[mysql@testvm3 mysql]$ ./bin/ndbd
2014-11-01 16:34:11 [ndbd] INFO     -- Angel connected to '192.168.137.201:1186'
2014-11-01 16:34:11 [ndbd] INFO     -- Angel allocated nodeid: 2
[mysql@testvm4 mysql]$ ./bin/ndbd
2014-11-01 16:43:28 [ndbd] INFO     -- Angel connected to '192.168.137.201:1186'
2014-11-01 16:43:28 [ndbd] INFO     -- Angel allocated nodeid: 3
7.3. sql node mysqld 실행
- mysql direcotry : /db/mysql 에서 실행 (mysql user)
[mysql@testvm2 mysql]$ ./bin/mysqld_safe &
[1] 26070
[mysql@testvm2 mysql]$ 141111 16:40:18 mysqld_safe Logging to '/data1/mysql-cluster/testvm2.err'.
141111 16:40:18 mysqld_safe Starting mysqld daemon with databases from /data1/mysql-cluster
7.4. 다 띄웠으면 ndb_mgm에서 확인
- ndb_mgm
[mysql@testvm1 mysql]$ ./bin/ndb_mgm
-- NDB Cluster -- Management Client --
ndb_mgm> show
Cluster Configuration
---------------------
[ndbd(NDB)] 2 node(s)
id=2 @192.168.137.203  (mysql-5.6.21 ndb-7.3.7, Nodegroup: 0, *)
id=3 @192.168.137.204  (mysql-5.6.21 ndb-7.3.7, Nodegroup: 0)

[ndb_mgmd(MGM)] 1 node(s)
id=1 @192.168.137.201  (mysql-5.6.21 ndb-7.3.7)

[mysqld(API)] 1 node(s)
id=4 @192.168.137.202  (mysql-5.6.21 ndb-7.3.7)
8. Safe Shutdown and Restart of MySQL Cluster
8.1. shutdown
- ndb_mgm -e shutdown를 통해서 shutdown 할 수 있다. 이 커맨드는 ndb_mgm, ndb_mgmd, and any ndbd or ndbmtd processes 를 gracefully 종료시킨다. SQL nodes 는 따로 mysqladmin shutdown 등을 통해 종료시켜야함.
[mysql@testvm1 mysql]$ ./bin/ndb_mgm -e shutdown
Connected to Management Server at: localhost:1186
3 NDB Cluster node(s) have shutdown.
Disconnecting to allow management server to shutdown.
[mysql@testvm2 mysql]$ ./bin/mysqladmin shutdown -uroot --socket=/tmp/mysql.sock
141111 17:37:06 mysqld_safe mysqld from pid file /data1/mysql-cluster/testvm2.pid ended
[1]+  Done                    ./bin/mysqld_safe
[mysql@testvm2 mysql]$
8.2. restart
- 잘되는거 같으니 PATH 넣고 다시 시작해서 잘 사용해보면 되겠다.
[mysql@testvm1 mysql]$ vi ~/.bash_profile
MYSQL_HOME=/db/mysql
PATH=$PATH:$HOME/bin:$MYSQL_HOME/bin

export MYSQL_HOME PATH
[mysql@testvm1 mysql]$ . ~/.bash_profile